Friday, July 17, 2009

#35 Easy Do-It-Yourself Frames for Photoshop, Brush Shapes

This is a quickie. To get you started:

1) Open the image you want done

2) Make a copy of the Background Layer, and delete the original background layerLeaf Frame1

3) Make an New Layer beneath the picture(check image for consistency)


4) Hold down ALT and click on the line between the layers(as shown on the image below)

Clipping1

Your layer should move slightly to the right like so:

Clipping2 

You should now have a blank screen to work with. Now, take your Brush, set it’s Size and Hardness, and start painting on the empty layer!ClippingFinal

My tip Is to use different shapes for your brushes for some interesting effects. For starters, try the built in leaf brush and you might get something like this(image on right).

For an added frame effect you can always add Stroke borders on your layer, and a background layer with a color or gradient on the bottom.

This has many possibilities, and try combining with other tricks you know for some exciting results.

You could also look for more Brush packs for Photoshop. A good place to start is http://www.brusheezy.com/.
Monday, July 13, 2009

#34 Easy Do-It-Yourself Frames for Photoshop, Photo Borders

The simplest frames are often the best ones. Especially if you’re in a hurry, or don’t want to lose focus with the photograph you’re framing.

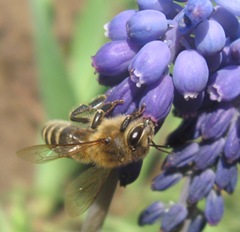
For this particular tutorial, a good choice of photograph would be one where the photo has one or two dominating colors. A good example is a wedding photo, where the dominating colors are the colors of the bride’s dress and bouquet, but anything will do. My choice:

beeThe obvious colors here are that purplish-blue  flower and the orange-yellow bee. The photo(by my standards) isn’t bad on it’s own, but suppose you want to add a bit of style to it.

Okay, now go to Image –> Canvas Size (Alt + Ctrl + C), and set it like so(click for a close up):

CanvasSize

So you just change the units to percent, set it to Relative and type in 6 (or any smaller number) for the size. For the Canvas extension color you click on the color box next to, and click on your image. Your mouse pointer turns into an eyedropper tool, and you choose the color for your border. This way you use the color from you picture. Click OK for the color picker, and OK again for the Canvas Size. I got:

bee2

The first part is done. Now, repeat what you did with the Canvas Size, but change the size to 30 this time, and pick another dominating color from the photo.

If you are not happy with the color picker, you can choose it manually.

So basically you make two different sized bands around the photo.

bee3Looking at it now, I probably should have used a darker purple. But maybe it’s just my BBB(black blog background).

Variations on this subject can include, but are not limited to:
-using more(or less) than 2 borders/colors
-different sizes, like making the first border thicker
-adding the Vignette effect beforehand for interesting results
-and so on…

Once you’ve read through this, you will realize that the longest part of this tutorial is looking for, and opening the photo, while the rest just zips by. Have fun with it!

Sunday, July 12, 2009

#33 Easy Black and White photos with some colored areas

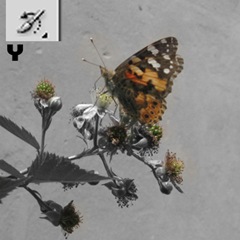
Ok, keeping it short and simple. Open the image you want to work with in Photoshop. Press CTRL+SHIFT+U to make it black and white(or Image->Adjustments->Desaturate).

BWButterfly

Now, all that’s left to do is select the History Brush tool(shortcut Y) and be sure to not select the Art History Brush by mistake.

Now just go over the areas you want to get their color back and voila:

BWButterfly2

If you accidentaly color too much of it, you can use the color replacement tool, and set it to Black, to turn areas back to black and white.

An importatn thing to note is that the Desaturate command should be the first and only modification prior to the History Brush tool. If the image was rotated, then the History Brush won’t work. So, if you come across this problem, then firstly color it, and then rotate it, or rotate it, save it, and open it again.

That’s it. Learn to control the brush size and feathering for the best results, and even opacity finds it’s use here. Have fun and enjoy.