Wednesday, December 31, 2008

#8 The Special Effect Cycle

So, you are looking for something give your videos some special effects, but you can’t make up your mind on which to use, ‘cause the choices are many, so you decide to use them all, sequentially.

The problem now, is how to fit them in, without the viewer getting a headache. Hard cuts just won’t do it. Here is how I do this.

The software I use is Adobe’s Premiere 6.5, but you can do this in practically any multi-track editing software, and even some single-track editing apps.

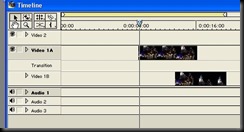
First, you have your one longer clip. Split it up where you want the changes to occur. Now you have many parts of that clip. Now, drag every other part into another video track. You should have something to this extent:

hair1

Now, drag the in points and/or outpoints so each clip overlaps with its neighboring clips. And add the basic crossfade transition between them. Like this:

hair2

If you pressed Play now, you would see nothing has changed from the original clip.

The last part I leave to you. Basically, you add the effects you want on your clips in the order you want them. Slap some music on, increase the transitions, and you get a psychedelic music video:

And that’s it. Now that you now the trick, all it takes is a little imagination, and you can make some very dynamic videos. For bigger projects, you might need more time, but the end result is worth it.

Happy New Years Eve!

Tuesday, December 30, 2008

#7 Peaceful to Spooky

2009 is just around the corner, so let’s get at least one more trick in before we say farewell to 2008.

I took a picture of my cat sleeping, and decided to fiddle with it in Photoshop a bit. Here was my starting image:

cat1

Peaceful isn’t he? What we are going to do now is turn this cute picture into something spooky, in 3 simple steps.

First thing I did, was use the crop tool to isolate his head. So we have this to go with:

cat2

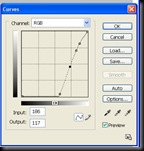
Now we go and fiddle with the color curves a little. Navigate the upper menu Image->Adjustments->Curves.

Adjust the RGB channel so the left side of the curve is all the way down, and the right side gradually grows. Mine looks like this:

cat3

Play with it till you have some powerful contrast in your image. You should get an effect where your darker areas are too dark, and your lighter areas get a sinister color.

The final step is just deleting any leftovers that you don’t need. I skipped this, so you can see the current state of my picture. Current result:

cat4

He doesn’t look peaceful. Now he looks uhm… dead. The point was that you can make some interesting effects with the Color Curves. All you need to do is fiddle with them a bit. And, you can always use selection tools to make certain areas like this, or create weird combinations(which I always find fun, yet educational).

After a little more post-work my end result is as follows:

BeheadedI call this one “Beheaded”. Heh, I guess it blends nicely with my black blog background(or BBB for short). Halloween might be over for this year, but it’s never too late to make some macabre photos!

Monday, December 29, 2008

#6 Animated Beat

This time, I’ll show you what to pay attention too, when trying to make your 3D Speaker beat to your beat.

First, you’ll need a 3D speaker, with the part that has to vibrate to the beat detached. But, for the sake of practice, you can even use a simple sphere, and we will make it’s size vibrate through the beat.

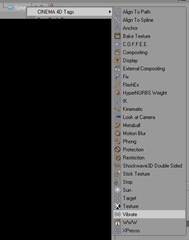
Now, there are 2 ways of going through this: the quick(effortless) way, and the long(or proper) way. I’ll show you both.Vibrate Tag

First, I’ll show you the easy way. Start off by making a sphere. Now, in Cinema 4D, add the Vibrate Tag to it(click on the image to enlarge it). I don’t know if you other 3D software has such a thing.

Select the Vibrate Tag, check the Regular Pulse checkbox, and Enable Rotation checkbox. Now all you need is to set the Frequency to match the beat you are using.

That’s the easy way. The reason why we are not sticking to this way is that it doesn’t really give us the desired results when it comes to replicating speakers. Although it can give you a nice “move to the groove” effect on your objects, for a more realistic effect, the sphere would need to grow in spikes, instead of so regularly varying in size. Something like …!…!…!… Instead of /\/\/\/\.

Now, delete the Vibrate tag, or start a new scene and just create a new sphere. Select the sphere and Add A Keyframe(ask me if you don’t know how). Now, move the timeline by 4 frames to the right and add another Keyframe.

Now move the timeline by 2 frames, make the sphere bigger(at least twice as big) and the add another keyframe. Then move the timeline by 2 more frames, and resize the sphere to it’s original size, and Keyframe it.

Now you have the first “bump”. You can proceed like this, or you can use Cinema’s ability to copy/paste keyframes. The end result of your timeline should look like this(click to enlarge):

codegen keyframes

When you press Play, you should get a certain beat. You can enter Cinema’s Timeline Window to stretch or resize the beat in a way that suits the music.

I modeled my Codegen Speakers in Cinema 4D, added materials, a camera, and used the above keyframe spread on the speakers and got:

There it is. The speakers weren’t to tough to model, If someone requests it, I’ll be glad to make a post out of it. You can apply these keyframing rules on any object that needs to move in accordance to the music, so have fun with it!

Friday, December 26, 2008

#5 Camera Perspective "Exponential Distance”

Macro Photography. Quite possibly the area of photography with the largest abuse factor, anywhere. Everyone is doing it, mainly, because everyone can. You don’t have to know squat about taking photos, and you can do it with any camera available(I would even go so far as to say you can do it with your vintage phone cameras).

If you still don’t know what I am talking about, check out wiki.

Granted, some make great macro photos. Most of those “great macros” are “great” due to the fact that portray something hard to take a photo of(be it ‘cause of rarity, distance, or the inability of the little bugger to remain still).

Now, what is left for those of that don’t have a rainforest in the backyard? We are left to use more common items, thus making it something that’s been done over a few millions of times. So, we have to be creative.

The trick for today is turning you ordinary run-of-the-mill macro photos into something a bit less run-of-the-mill, by using an interesting perspective. I bring you, exhibit A:

piano rollYea yea, I know, I have a little red stuff ruining the composition, but the color is not what we are here for. Notice, the diagonal point-of-view. It gives us the exponential growth from far to near, hence the title(I guess I need a tutorial on making titles).

You get this by placing the camera very near one end of the subject, in this case, the last key, and snapping it.

Stab_by_NebojsaC You can do this with pretty much anything. If not, then I am sure you can come up with another interesting perspective. I will be adding more of them in the future.

*Cue Murder in Elm Street soundtrack*

It’s good looking at stuff from different perspectives. Go ahead. I dare you!

#4 From Cartoon To Life

I am going to show you how to make a video that turns into an edge magnified version of itself. The easy part is that you don’t have to work with keyframes here, so all you need to know is how to drag and drop any effect onto a clip, how to cut the clip and how to add a transition. And those are some core basics.

The software I am using is Adobe Premiere 6.5, but I know for a fact that this can be done with the same ease in Sony’s Vegas. I don’t know about Windows Movie Maker, but you should move on from that program anyway.

Firstly, you need a video clip to work with. You can even do this with an image, for learning purposes.

Put it on the track, split it down the middle and put the second part in the other track. Now, move the out point of the first track a few seconds to the right, so it actually covers the second track a bit. It should look something like this:

cartoon1

Now, all that’s left to do is to put a transition between the, and any desired effect on one of the clips. Use the “Cross Dissolve” transition, and use the “Find Edges” to get an idea how to use this. And just export this. The result:

Yes, it doesn’t look like much, but you can use this simple trick to  spare you the hassle of working with keyframes, and if you get the right idea, you could make some interesting videos.

Wednesday, December 24, 2008

#3 Cloning Yourself

I was meaning to make a new picture using this trick, but it’s 8:30 AM, the morning before Christmas, and I just got back home 2 hours ago, so don’t hold it against me!

As the title itself says, I am going to show you a simple trick using Photoshop. I will be using CS 2, but it’s basically the same in any version. All the pre-learned knowledge you need is the use of layers, and only some basics, but we can learn that here as well.

First things first. Set up your camera so it has the perspective that you need, like for instance a wall, or your room. Just make sure the camera can stand on it’s own, and that you can take photos without moving the camera. This is necessary so we can make the needed editing without much hassle(yea, I’m lazy as hell).

For this example, I took pictures of myself in my room, wearing different shirts, and standing in different positions. One of such was:IMG_0176

Then I took more without moving the camera. I switched shirts, and used the cameras timed shoot function.

Now that you have all the positions you need, you can put it all into Photoshop. Make it so that all the pictures are layers, one on top of the another.

You should have your layers looking something like this:clone1Be sure to arrange them so that the photos in which you are in the back are the bottom layers.

Now, select the first picture and use the Eraser Tool to delete the area of this picture in which you aren’t there. Repeat for all of the picture’s except the bottom one.

That should be it. The basics are here, and you can fine tune the colors if you want. My result was this:

So that’s me four times in one photo! And it’s easy for you to do it too! Until next time! Of I go to argue with my other selves now.

Tuesday, December 23, 2008

#2 Weird Complicated Shapes in 2 Minutes

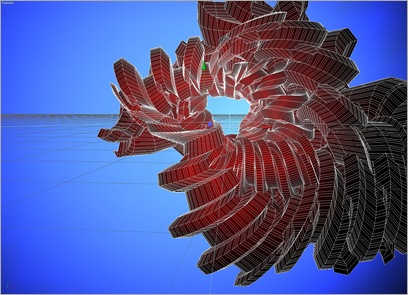
Imagine having to build this object with your basic modeling techniques:

CrumbledSplineWire

Looks painful doesn’t it? On the contrary. You can actually make this 3D model in under 2 minutes simply by knowing what tools and shapes to use.

Now, the 3D software I use is Cinema 4D, but it’s a known fact that you can make anything in any of the major 3D apps(Cinema 4D, Maya, Lightwave, 3D Max…) the only differences are the names of their tools. So, if you are using a different 3D app then Cinema, you might have to experiment and search a little before you are able to use this trick. I use Cinema 4D cause of it’s easy learning curve, and intuitive interface.

untitled

The tool we will use is “Sweep NURBS”. This tool uses Spline (or path) objects to create combination objects such as the one on the first picture. For instance, to make the object on the “Sweep NURBS” symbol, you would need a circle and a slightly curved line. The circle would travel along the path of the line to create that tube like object. You could also make the line follow the path of the circle to get yet another object.

To get the following object you will need to combine a 4-sided path with a flower path.Nurbs2


NurbsBlog

Now imagine having to make this from scratch. Sure a mirror object could help out, but this is by far the fastest way to make such objects.

The problem here is that the end result is completely unpredictable when using some more complicated paths. You can also use a third path for more variations. Another problem being that you can’t actually use this to create something specific, but it can serve for a better start opposed to the standard box start for modeling.

Rather then creating real world representations, you can use this to create very interesting abstract pieces. And with the right camera angle, light and material, you could use the wireframe on the first picture to create something like this:

CrumbledSpline

Voila! So there you have it. Mix and match different paths and don’t forget to try and reverse their order for different results, and you may end up making something beautiful! Of course, beauty is in the eyes of the beholder.

Monday, December 22, 2008

#1 Outlines in The Dark

It seems to be time to get this blog rolling. For the first trick, I am going to post a photo that “brakes” a couple of basic photography rules. But, since I am an amateur, breaking such rules is what I do on a daily basis. Hey, nobody ever learned anything by keeping inside the guidelines! What’s more, this photo is my personal favorite!

SaxBlog

One of the basic rules of photography is, keep the light source behind you(the photographer). Obviously the (orange)light source here is placed behind the “object”. This gives us the nice looking outlines on the instrument and artist.

Personally, I prefer this kind of photo, opposed to the classic light-in-your-face photo. It gives it an artsy fell, now doesn’t it?

Also, it was very important that the ambient light be non-existent. It gives us the contrast that we have in this photo. Another plus!

This photo was taken during a concert, so you don’t really have an opportunity to get everything the way you want, so you just go with the flow. Although I could have been standing on the other end, I choose not to. The choices you make in the split seconds you have are key.

Sure, this photo needed some luck and timing, but you can make similar photos with the appropriate studio light. Now, you could order such light. I believe the cost more than a hundred Euros. Alternatively you can make your own. All you need is a dark room to take the photo in, and a powerful colored light bulb, which I think isn’t so hard to obtain, or make for that matter. So have at it!

Ok, so that’s the trick for today. Hope you learned something new, I know I did(always enable the auto save function before writing your first post!).